
Gear for winter mountaineering in Japan

Winter mountaineering in Japan is one of the most enjoyable activities someone can do, not only for the beautiful scenery but also for the accessibility of these areas, the winter huts, and the tremendous traditional Japanese meals that can be found in these huts.
I try to spend as much of wintertime as possible climbing technical alpine routes, but I also enjoy simple winter camping. Japan has a lot to offer in terms of snow trekking. My favorite playground is the Yatsugatake range, located between Yamanashi prefecture and Nagano prefecture. The reasons why I keep returning to Yatsugatake every year are multiple but above all is the accessibility of these mountains from Tokyo. For a public transportation enthusiast like me, winter can be discouraging; the lack of buses and the many closed roads are simply unnerving. Conversely, Yatsugatake is almost more populated in winter than any other season. And I can get to the trail-head in less than 3 hours from Tokyo.
There are many activities you can do in the area, from easy snowshoeing in the Northside to the many natural (and artificial) ice falls to climb in the South Part. Even a bunch of technical mixed alpine routes are classics of winter alpinism in Japan.
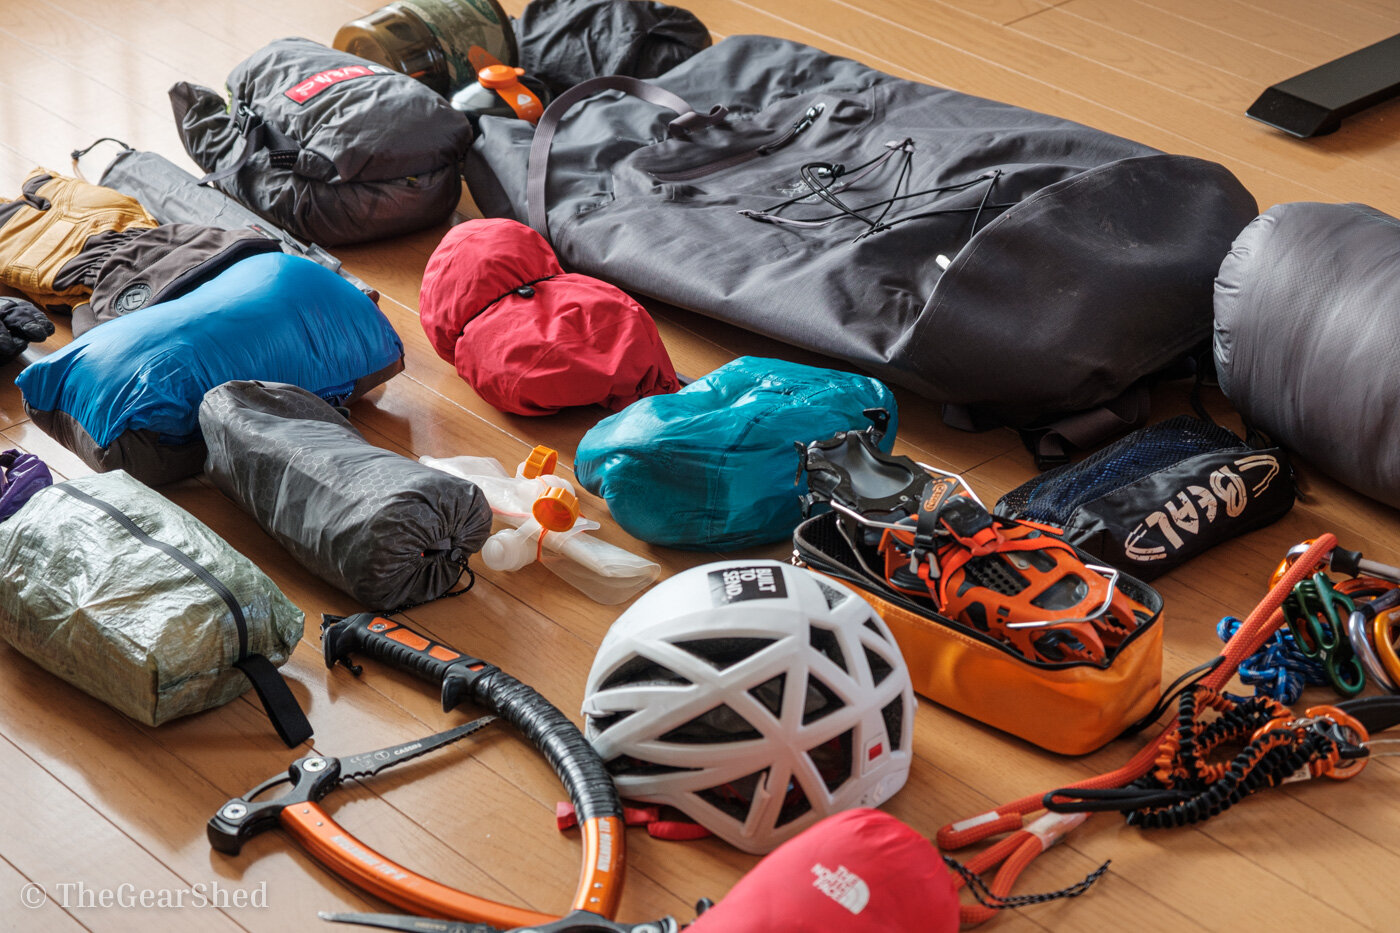
With this article, I want to explain my winter set-up for various activities, from basic winter camping to slightly more technical alpinism in the Yatsugatake area.

Akadake Kousen Hut in South Yatsugatake


The Backpack
I had the chance to write about the Hyperlite Mountain Gear Southwest 3400 several times on this blog. It is so far one of my favorite backpacks and probably the one to which I'm the most sentimentally attached.
The Southwest has also been my pack for winter for another reason: it’s a 55L backpack, which is the smallest I’ve been able to use for a multi-day camping trip in the snow. FYI, I’ve tried fitting the same amount of gear in a smaller pack—such as the 40L Arc’Teryx Alpha FL or the 37L Mountain Hardwear Scrambler—with the disappointing result of strapping too many items outside of the backpack.
It’s fair to say that throughout the years, I have proudly downsized from an Osprey Atmos 65L to 50L backpacks for winter multi-day camping trips, so I think I have become quite good at selecting essential gear only. (Still far, though, from what the pro alpinist Steve House can compress in a 30L winter climbing pack.)


How big should a backpack be for multi-day winter mountaineering in Japan?
There is no right answer to this; I would say it depends on where you are going. The most popular Japanese mountains in winter are usually full of open huts. For instance, if you decide to go to Yatsugatake, I’ll definitely recommend having the whole winter hut experience at least once—you won’t regret it. If you stay in a hut, you won't need any camping gear; this will help reduce your gear and fit everything into a 30-35L pack.
Japanese backpackers tend to bring more things than necessary to be comfortable and have enough food. The average backpack size I see on snowy trails goes from 60 to 75L for people carrying camping gear and winter climbing gear for a few days. This will be pretty common to see in Yatsugatake, which is a popular destination for ice climbing in Japan.
Most recently, I see more and more people carrying lighter and ultralight gear for winter, all packed into the 40L Three backpacks by Yamatomici, but these folks are quite seasoned ultralight backpackers and sleep under a tarp.
A pack I would be interested in testing in winter Yatsu is the Arc’Teryx Alpha AR 55, which is the big brother of my Alpha AR 35, an all-around/climbing rucksack I simply love (I reviewed the 22L version on this blog).
Watch Steve House packing his 30L pack for a winter alpine overnight.
CLOTHING - Layering depends by the activity
Now a list of essential clothing I pack for a winter mountaineering trip in Japan.
Japanese winter temperatures go pretty low. The harshest negative temperature I have experienced in winter alpine was about -25C, during a frigid winter in Yatsugatake. I remember that day clearly because I felt glad to be sleeping in the hut. The coldest I've been sleeping in a tent has been about -20C, and I barely made it to the next morning with very little sleep.
A good layering system is essential for low temperatures, especially when doing a physical activity like mountaineering. Getting cold after scrambling up to a ridge where the windchill decreases the perceived temperature or while belaying your partner on an icefall is a common mistake that not only beginners make.


Base Layers
I’ve been trying several different base layer systems but nothing works like Merino Wool in such a performant way. A Merino base layer keeps you warm and lets your sweat dry quickly so it doesn’t stink as much as other fabrics do... which is a plus value for everyone. LOL
My Merino wool base layer is a set (top and long-johns) I got from Montbell years ago. I usually wear these as soon as I set camp, and not o the approach. I keep the layers on during the next morning of the climb to maintain the warmth from the night before.


Insulation Layers
My favorite fleece is the Patagonia R1, which is my most used piece of gear. Made famous by many climbers and most recently by Tommy Caldwell (he wears it in the Fitz Roy traverse), the R1 is a gridstop Polartec fleece that only weighs 250gr for the updated version (the previous version was slightly heavier and probably slightly warmer). I use this fleece on many occasions; sometimes alpine climbs as a warm layer for chilly nights, even in summer. I have a slightly lighter substitute, made by NWAlpine.

Millet Polartec tights or Montbell synthetic insulation 3/4 pants
Softshell pants
My winter alpine pants do not differ too much from summer ones. I like lightweight TNF softshell pants which I use all year round. In particularly cold situations where I know I’ll be subject to spin drifts, e.g. while ice climbing or on technical routes, I use a slightly heavier pair by Mammut.
Below my shell pants, I might wear Merino long-johns in those days where I spend a lot of time on the wall belaying my partner. Japanese mountains are usually very windy, and in winter conditions, some of the routes can be very exposed to windchill; for this reason, I always have a pair of windshell over-pants by Mountain Hardwear. If the season is particularly freezing or the weather is supposed to turn nasty, I switch the Merino long-johns with a pair of extra thick Polartec tights by Millet. The usual set-up looks like this:
Normal Hiking: Softshell pants + windshell cover in the backpack.
Technical climbing: Merino long-johns + Softshell pants + windshell pants
Extreme weather climbing: Thick Polartec tights + Hardshell waterproof pants.

Waterproof Layers
Softshell vs Hardshell
On top of the fleece I’m mostly gonna wear a Softshell.
I see many people bringing only a hardshell on top of their insulation layers, but I believe that in a day of good weather, the breathability of a softshell is unbeatable. I still prefer the softshell for ice climbing in a controlled environment like the easy ice routes in the Yatsugatake range. My softshell go-to is the Black Diamond Down Patrol Shell which is so far my favorite jacket ever. This shell's pockets are simply perfect; three external and two internal can hold spare gloves and quite a lot more stuff like snacks, headlamps, chemical warmers, or even a thermos.
As much as I really love the hardshell—and I’m a sucker for Arc’Teryx shells—I don’t find many occasions to wear it, except when climbing technical routes where I can’t really spend too much time exchanging layers and on early morning windy ridges where the icy Japanese alpine winds hit you exactly in every tiny unprotected spot.
My hardshell of choice is the Arc’Teryx Alpha FL and the SV.
The FL shell is a “pac-lite“ Goretex shell that literally lives inside my climbing backpack. It’s the shell I use for everything from summer to winter.
The Alpha SV is like an armor to wear exclusively in the most challenging conditions and with the worst weather .

My hard shell layers
Insulation Jackets
How warm is warm enough? Down jackets are something I usually wear when I'm at the camp. I select the jacket based on the temperature and how much warmth I have to add to my sleeping set. The jacket I use the most is The Mountain Hard-wear Ghost Whisperer down, incredibly warm for its weight. I'm able to push myself using this jacket through the winter if paired with another layer of insulation, mostly synthetic like the Black Diamond hybrid hoodie.
When the temperatures are lower than negative 10 and I'm not doing anything technical that requires the versatility of two layers, I use the heavy down Outdoor Research Incandescent down hoodie. Very warm, I got one size larger than my size to put it on top of everything in case I need.

Down puffy jacket for camp and synthetic insulation fleece for “wet” conditions.
Gloves and Mittens
Gloves are the most important part of the equipment. The professional mountaineer **** recently made a series of posts on his Facebook page regarding the best strategy to avoid "screaming barfies" or front nips, typical of ice climbing and winter alpinism. Depending on the type of activity and how many days I stay on the mountain I can bring between 3 and 4 pairs of gloves.

The thinnest gloves I use are simple liners by Black Diamond, made out of Polartec. These are basically always on from the trailhead. They are also good as a base layer for my mittens.
My climbing gloves are a pair of medium-weight by Montbell. These gloves are explicitly recommended for ice climbing. I alternate those with a heavier pair, still by Montbell, and switch them depending on the type of adventure.
The gloves I wear anytime I start feeling cold hands are actually...mittens. To keep my mittens warm and dry, I usually keep them inside my jacket, under the armpits. I use a pair of Black Diamond Guide mittens that are simply great. I have an ultra-heavy down mitten by RAB for harsher conditions, But I found that they are definitely overkill for any situations that don't involve very low temperatures.
Switching between gloves will definitely help to keep your hands warm, especially when holding ice tools and belaying.
Socks
My go-to socks are the Darn Tough Hiking heavy duty socks that I switch with Merino Expedition heavy socks when inside the tent. After repeating the same mistake over and over, I've learned that having dry socks and dry boots insoles are key to avoiding frosty toes. Change your socks after the approach and use a dry pair for the morning summit attempt. I toss my wet socks under my sleeping bag and literally sleep on them; usually, body heat dries them out. Don't hang them outside the tent unless you want to find frozen socks in the morning.


Beginner mistake: Never leave your boots freezing outside the tent. It will compromise your success.
The winter boots
My boots for the winter are the La Sportiva Nepal Cube GTX. They are probably the most popular here in Japan—so popular that people have to write their name tag or personalize them to avoid getting their boots mistakenly taken by somebody else in the huts. (Yes, in Japan, the rule is no shoes inside the huts and lodges). When camping, after a full day of trekking in the snow, it's essential to remove the insoles from your boots and make them dry inside your sleeping bag. It's also a common mistake to leave the boots outside the tent. You'll wake up with frozen boots, an epic fail that will compromise your day of climbing or winter trekking.

The tent
I've been talking about my tent in a few articles. I've been using the Nemo Tani 1P for quite a while now, and I love it. The sturdy cross pole dome only weighs 1000 grams, and it’s the minimum necessary livable space I require in winter. I’ve tried others, lighter tents, but I always come back to this little double wall. The reason I like it so much is its size. This is a small 1 person tent with plenty of space to not feel the necessity of bringing a bigger / heavier tent as many do in winter. In cold temperatures, there are a series of movements you have to perform inside your tent: getting out of your sleeping bag, making breakfast, dressing up, trying to not get your hands cold in the freezing mornings below zero, and avoiding an unwanted icy shower from the condensation on the walls of your tent.


The Sleeping Bag
The sleeping bag is a crucial piece of gear, almost like the sleeping mat. The bag I recommend for Japanese winter camping should guarantee a solid -10C Comfort. I want to stress the word “Comfort” and not "Limit". In sleeping bag ratings, "comfort temperature" indicates the temperature at which a cold sleeper might feel comfortable. This is the temperature rating brands use on women's bags. A lower limit rating (which is always lower than the comfort rating) indicates the temperature at which a warm sleeper might still feel comfortable... The limit is the temperature at which an Adult man can have a decent sleep without feeling cold.
A Sleeping Bag that says - 10 Limit means it will be, in fact, a -3/-5 Comfort. To get a solid -10 comfort, you should look at bags rated -20 Limit or so—expensive stuff. It’s fair to say you can increase your bag's performance by wearing a down jacket, down pants, and down booties. On the coldest days, I've used a -15C limit bag paired with a perfect down puffy jacket, insulated tights, and down booties. When the gear is not enough, there is still the good old method of boiling water and filling up a bottle to toss in your sleeping bag. Just make sure it doesn’t open. Also, everybody who lives in Japan has supplies of disposable Heat Patches (Kairos) that can be attached all over your body to guarantee 8 hours of toasty comfort.
My sleeping bag is a Japanese down bag, the ISUKA air SL 900. Very good price for 1200 grams. It's a -25 limit that guarantees coziness for temperatures around -15/-20 degrees.
The Sleeping Mat is a piece of gear I've changed so many times without finding complete peace of mind. When very comfortable, it's heavy; when comfortable and lightweight it's too cold; when light and warm it's uncomfortable. I'm recently using an Exped Winter Mat, which is very warm (R-value is 7) and incredibly light (480g) but far from the comfiness of my Nemo Tensor. Spoiler Alert: You don't need such a high R-Value; you can definitely use your favorite (comfortable) air mat with a lower value and pair it with a closed-cell foam mat like a Thermarest (very cheap). You'll have a pretty decent result. But I hate strapping stuff outside my pack and believe that a single mat comes in handy in fast alpine attempt bivys.

The “extra warm” Isuka Air 900 SL, limit temp rating -25 degree celsius.
Cooking System
Winter mountaineering in Japan means snow. A lot. Carrying bottles of water is nonsensical. They will freeze in the approach, and you'll be loading your pack with many, superfluous kilograms. Melt snow! To melt the snow, I have a Jetboil Minimo. The large pot allows for melting enough snow in one or two goes to satisfy my necessities for one meal. Also, it works in windy situations—very recommended. Another piece that should not be missing from your cooking set is a good thermos that can keep the temperature for at least 6-8 hours. You want to make that hot tea in the morning and bring it with you in your summit attempt on the Akadake. When doing technical climbing that requires partner belays, the hot drink thermos is the best thing you have in your backpack.

More
Other gear I carry with me in winter is a helmet, snow goggles (crucial for stormy ridges), face mask or balaclava, warm hat, and gaiters. Of course, I'll pack my crampons, ice axe or ice tools, and climbing gear if I go for some technical ascents.
I was also going to write my take on PEE BOTTLES... but I decided I'll leave it to the reader's discretion to search for information about the specific "systems." But I can recommend a specific brand of Protein Milk (Savas) bottles that you can find in a Japanese supermarket which provide just enough volume..
This is my personal list of items I bring in winter on the Japanese alps trips. It probably won't fit everybody and may even seem like overkill for somebody else. But the good thing about the list is that it can be upgraded and rescaled with experience. Feel free to message me and share your personal kit.
BONUS: CLIMB JAPAN
For those folks looking for winter technical ascents, I recommend Tony Grant’s Climb Japan blog (and books!). You will find route descriptions, the necessary gear list, and much more.


Lighterpack
If you wanna check my gear list, complete with model names and weight; You can have a look at my LIghterpack page.
Also, feel free anytime to contact me for gear or location advice!
LIGHTER PACK LINK: https://lighterpack.com/r/yp8331
The most important thing, be safe and have fun!
